Wednesday, October 11, 2017

Antique Flower Vase On Modern Doily

I was inspired by an antique lampshade and a flower
vase that have roses designed on them.  This is what gave me the idea for the Rose Doily.


Below is a photo of my Curtain Tie Back that I designed a while back.  It's nice to have matching home decorations and accessories.  I can see that I need to add a dark pink border to the Rose Tieback, don't you think so?

The pattern for the Tieback is available at this site; the pattern for the Rose Doily is pending.

Have a Blessed Day!


Sunday, October 1, 2017

She Is Ready For A Cooler Weather!

I ordered a display mannequin from Amazon and I am happy to have her.  She is easy to work with.  The price is also very reasonable.  Even though she is made of plastic yet she looks great and because she is plastic, she is very light.  The arms and head are removable and can be moved to change position.  She has eyelashes.  I have to put a bit of lipstick on her lips so that she does not look too pale; I applied eyeliner also.  I also darkened the edges of her irises to diminish the googly appearance on her face.  She looks more natural now.  She is wearing the "Snow Flower" shawlette and the hat that I made.  She really is ready for a cooler weather!


Happy FALL SEASON to all!!!

Sunday, September 17, 2017

Video Tutorials For Beginners

Hello everyone!  I uploaded video tutorials for beginning crocheter.  Please check them out.  Thank you.  Please click here
Have a wonderful Fall Season!

Tuesday, September 5, 2017

How To Understand The Language Of Crochet -- #1

Crochet has it's own language and to a person just starting to learn the craft, it must be daunting.  One student told me, when we were talking about "dc on dc",  "you know how crazy that sounds!?"
This phrase or crochet command sounds perfectly sane and normal to me but I've been crocheting off and on since I was seven or eight years old.  One thing I realized is that crochet instructions are sentence short hands and this is the part that beginning crocheter learning to read pattern need to understand.

Crochet instructions usually omits words such as "you make" or "you do" because it is understood that the reader (you) of the pattern is the one being addressed.  To include these words on the instructions will be very repetitive and cumbersome and will make the written pattern so much longer.  In the following sentence, for example:  You make a double crochet stitch on the next double crochet stitch of the previous row (round), in crochet pattern instructions it will be written as, "dc on next dc," see how short this instruction is?  The words "you make" is ommitted, and "dc" instead of being a noun becomes a verb which tells you to make a double crochet stitch.  The phrase "of previous row (round)," is also omitted.  It is understood that the new crochet stitches are being attached to stitches of previous row or round so there is no need to keep repeating this phrase with every command.

What does next dc mean? when the pattern says "next dc", it actually is referring to the dc of previous row or round (as mentioned above), that is next or adjacent to the current stitch just made, because in crochet, the crocheter is always working on the previous row or round, except when working at the sides of rows to make edging or borders.  In the photo below the current stitch which is a ch-2 counted as a dc is marked by an arrow and the arrow is pointing to the hole which the ch-2 created when attached or fastened into a double crochet stitch of previous round.  The next stitch where the hook should be inserted to make a dc (double crochet) is the hole where the pin is located.  In order to see which one is the next stitch, you have to see where the last stitch (current stitch) is attached and the stitch closest to it is the next stitch.  See photo below.


Stitch VS Space

Where do you insert the hook, on a stitch (st) or space (sp)?  It is important to know that the two are not the same.  One obvious difference between stitch and space is that the hole to which a hook can be inserted on a stitch is a lot smaller than that of the hole (space) created between 2 stitches.   The hole of a stitch is sometimes hard to see and you have to use the tip of a crochet hook to pry the stitch open and see the hole to which the crochet hook can be inserted as in the  above photo where the pin is placed.

Crochet instruction variations that mean the same:  Sc on next sc also can be written as Sc on next st. It means to make a single crochet on next single crochet stitch.  Stitch is a general term for all crochet stitches such as: Sc, dc, tr, slst etc.

Space:  In Crochet usually refers to the space between stitches or the space created under chain stitches.  Space under chains can also be referred to as a loop.  It is important to remember the distinction between stitch and space to get the expected result that the pattern calls for.   See Photos below.

In photo above the hole associated with the stitch is where the pin is located.  This is where the crochet hook is to be inserted when a crochet instruction says "dc on next st" or "dc on next dc stitch" another instruction variation is to say "dc on top of next dc" they all mean the same thing.

On the photo above, the bottom pin is placed in space between 2 dc(s) or double crochets and the top pin is place on the stitch.  An example of crochet instruction that is requiring to use the space between 2 double crochet will say something like this,  "skip 2 dc then dc on next space (sp)".  In this case, if you are a right handed crocheter, you will start counting from right to left, from the stitch where your last stitch is attached and skip the specified number of dc(s) then insert the hook on the space immediately after the skipped stitches.  If you are a left handed crocheter then reverse the direction of counting and use the same instructions.

In above photo, the pin is placed on the ch-3 space, which is a space under the 3 chains at the corner of this granny square.
Loop

Use one loop or two loops?  There are 2 strands of yarn visible on top of each stitch:  The one facing you is called front loop; the one facing away from you is called back loop.  Unless the pattern specifies to use either back loop or front loop, both front loop and back loop are used when inserting the hook to make a stitch.  Using both front loop and back loop makes a stable and strong crocheted fabric and using only one will result in the opposite characteristics of the crocheted work.  See photo below.


On photo above, the crochet hook is inserted on both front and back loop of a stitch.

There are a lot more things that can be discussed related to this topic but I will save them for my next post.

.
Thank you for stopping by and I hope I shed a little light that help beginning crocheter.

Happy Crochet Day!


The Importance Of Making A Swatch In Crochet


What is a crochet swatch?  It is a small piece of crocheted work that represents all the stitches used in a pattern for a specific crochet project.  It is also used to check the gauge to make sure that the crocheter meets the required measurement per number of stitches.  It is important in making fitted garments or fashion accessories to ensure that the finished measurement of the garment is met.

Another purpose of making a swatch is to get the crocheter be familiar with the instructions and how the series or string of crochet instructions look once they are made.  It becomes easy to follow instructions given once a crocheter understands and see the result of the crochet commands given.

To determine the size of the swatch, one must look at all the stitches used and the series of repetitions vertically and horizontally.  The swatch should include all the stitches used and all the stitch combinations and repeats both vertically and
horizontally.

Sometimes a pattern is made up of a series of motifs.  In this case, make a swatch that is composed of one motif.  You can determine the size of the project based on the swatch by measuring the width and the length of  the swatch and multiplying them by the number of times to repeat the size of the swatch to obtain the desired size of the project.  You can also use the swatch to determine how many yards of yarn it will take to finish a project by determining how many yards of yarn it takes to make the swatch; then multiply the number of yards per swatch by how many repeats of the swatch it will take to complete a project.

How to determine how many yards per swatch is another topic, I'd like to discuss in a separate post.

Thank you for stopping by and have a fun Crochet Day!


Saturday, September 2, 2017

Tips For Beginning Crocheter -- How To Read And Follow Written Crochet Instructions

Crochet Pattern Instructions are usually made up of series or string of instructions within a single sentence and the best way to understand and follow it is to read and do one string of instruction at a time.  The string of instructions are usually separated by comas or semicolon and end in period at the end of the sentence.  Begin by reading and doing from coma to coma or from coma to semicolon or to period.  This action is similar to taking small bite of food so that it can easily be chewed.

Reading a Crochet Pattern Instructions alone does not make sense.  It is hard to understand crochet commands or instructions unless they are followed word for word in proper sequence within the string of commands.

Skipping one or two commands or instructions is a common mistake because they are so similar and hard to distinguish from one to another.  It is easy to get lost within the series of instructions.  The way I minimize error due to this fact is to use lead pencils or see through labels which I use as markers for current string of command I'm currently doing.  I move the label to the next string or if using pencil I check mark the end of the string I completed, before I start the next string of command.
See photo below.

On Round 1 of this pattern, there are 4 strings of commands indicated by red numbers and brackets.
The strings are separated by comas, and period.  The commands must be followed word for word from 1 to 4 in sequence.  Note the yellow transparent label that I placed over string of command #1 to indicate the current command or instruction that I'm doing.    I don't worry about the next command until the current one is done.

Crochet Pattern Instructions is either for projects that are made up of crocheted rows or the project is crocheted in the rounds.

Crocheted rows require turning the work right side up then wrong side up alternately.
Crocheted rounds start at one point and ends in the same point.  A marker is usually used to mark the beginning/ending point.

This is all for now.  I hope this post is of some help.  Thank you for stopping by.

My next post will be "How To Understand The Language Of Crochet."


Friday, September 1, 2017

Tips For Beginning Crocheter -- Choosing The Right Project And The Right Pattern For Beginning Crocheter

Let's get ready for the cooler weather!  Make something that will keep us warm.  Make a hat, a mitten or a scarf.  There are lots of written patterns and video tutorials available on the internet.  One only has to decide what to make and what pattern to use.  It's hard to make a choice because of the abundance of wonderful projects to make, abundance of patterns and also abundance of different yarns available in the yarn market.

If we don't watch we will be spending most of our time browsing the internet to help us make decision but getting distracted because of so many things that we see.  So how does a crocheter (crocheter, not an official word according to the autocorrect), make a decision without getting distracted?

My suggestions are:  1) Decide on what you want to make without relying on the internet.  Once you decide this then 2) look for the best pattern that you like using the internet, such as Ravelry, Craftsy, Etsy and many other sites.  Be mindful of time spent browsing, otherwise you waste so much of it because there are so many pretty patterns on the internet that it is hard to choose.  You can use written patterns on Crochet Magazines or Crochet Booklets available at Walmart, Hobby Lobby, Michael's and other craft or yarn store,s in your area.  Video tutorials are also great.  I watch and follow tutorials on YouTube! 3)  Decide on the type of yarn based on what the choosen pattern requires and make sure to buy enough yarn.  It is better to have extra yarn than to run out of it before the project is finished.  It is hard to match color.  To match the exact color in yarn, you have to go by "dye lot" number.  4)Finally, buy the crochet hook called upon by the pattern.

Gauge VS size of Crochet Hook:  It is important to follow gauge in order to achieve the correct sizing of the project.  Obtaining the specified size, specially for fitted garment is complicated in crochet because the size of individual stitches is affected by how tight or loose each crocheter crochets  therefore I would not suggest to beginners to make garments or fashion accessories that has to fit exactly.  Another fact is that individual stitch is also affected by the crocheter's mood.  For example, if the crocheter is tense, he or she would crochet tightly and when relaxed, he/she would crochet loosely so that in order to keep stitches the same size, you have to maintain the same focus and attention to your stitches all through the project and checking your stitches for uniformity until project is completed.

Loose fitting scarves, cowls, handbags or purses; small dish towels or hand towels are appropriate for beginning crochet projects.

In selecting the pattern, keep in mind the stitches that you already know and choose a pattern that uses stitches that you are familiar with.  Everyone enjoys challenge most of the times but when the challenge is too much, it is easy to get overwhelmed.  It is better to do a simple project that you know you can finish than choose a complicated one because the joy comes mostly in having completed a project.

Free Pattern for the Hat is available at my other crochet site City Girl Crochet.
Thank you for stopping by.

My next post will be The importance of Swatching.  First of all, what is "swatching"?  Please find out on my next post.

Monday, April 24, 2017

Desert Rose Scarf/Neck Warmer -- Crochet Pattern


Tools And Materials:

Yarn, medium weight (4), I Love this Yarn, Metallic or plain, one color of your choice; for small size -  1 skein; for medium to large - 2 skeins.  Each skein has 252 yds/230 m.  Crochet Hook - 4.25 mm; Yarn Needle.

Crochet Terms, Abbreviation And Meaning:


Sp = Space - It refers to space created by series of chains, example: Ch-3 space, ch-5 space,
ch-7 space. Note: Ch-3 loop, or ch-5 loop etc. , may be used instead.

Lp = Loop - It refers to the series of chains. It also refers to part of any stitch such as the back
or front loop (strand of yarn) in a single crochet or other stitch.
Sk = Skip - means skip a stitch or space etc.
Tog = Together - refers to stitches that are joined into a single stitch. example dc3tog, means,
make three double crochet together. This stitch is used in creating clusters or pointed
petals.

Ch = Chain

Slst = Slip Stitch

Dc = Double Crochet

Tr = Triple Crochet

* * = Asterisk - Refers to the instructions between these.

( ) = Parenthesis - Instructions inside ( ) must be repeated as many times as indicated by the
number that follows it.

[ ] = Bracket - Instructions inside it will be mentioned and/or repeated.

>> = Points to the beginning of instructions to be followed.

R = Round or Row

O = Old - Refers to the first (old) motif done.

N = New - Refers to the new or current motif that is being completed.

Yo = Yarn over - refers to the yarn being coiled or wrap around the crochet hook to make a stitch.
The yarn is wrap around the hook counter clockwise.

(B)sc = Beginning Single Crochet - Refers to the first single crochet (sc) made at the beginning
of round or row. In this crochet pattern which works in Rounds (B) next to a stitch designates that stitch to be the beginning stitch to which or part of which, the slip stitch that will be done at the end of the round must be attached.

The Pattern:

Ch5, slst on 5th ch from hook to form a ring.

R1: Ch4, sc over ring. (Ch4, sc over ring)7x. 8 total ch-4 loops made.

R2: (B)sc on next ch-4 sp. Ch1, 4dc on same sp, ch1, sc on same sp. (Sc on next ch-4 sp, ch1, 4dc on same sp, ch1, sc on same sp)8x. Eight Rose Petals made. Slst on (B)sc.

R3: Ch1, [with your thumb, mark the space between 2nd and 3rd dc of next petal, insert hook from back (wrong side) to front (right side) of this petal into the marked space, over the previous Ch-4 loop of R1 and back to the wrong side and make a sc]. (Video Tutorial available soon).
(Ch5, [ ])8x. Slst on the beginning sc of this round.

R4: (B)sc on next ch-5 sp, ch1, 6dc on same sp, ch1, sc on same sp. (Sc on next ch-5 space, ch1, 6dc on same sp, ch1, sc on same sp)7x. Slst on (B)sc.

R5: Ch3, [ with thumb, mark the space between 3rd and 4th dc of next petal, insert hook from back (wrong side) to front (right side) of this petal into the marked space, over the previous ch-5 of R3 and back to the wrong side and make a sc]. (Ch5, do [ ])8x. Slst on beginning sc of this round.

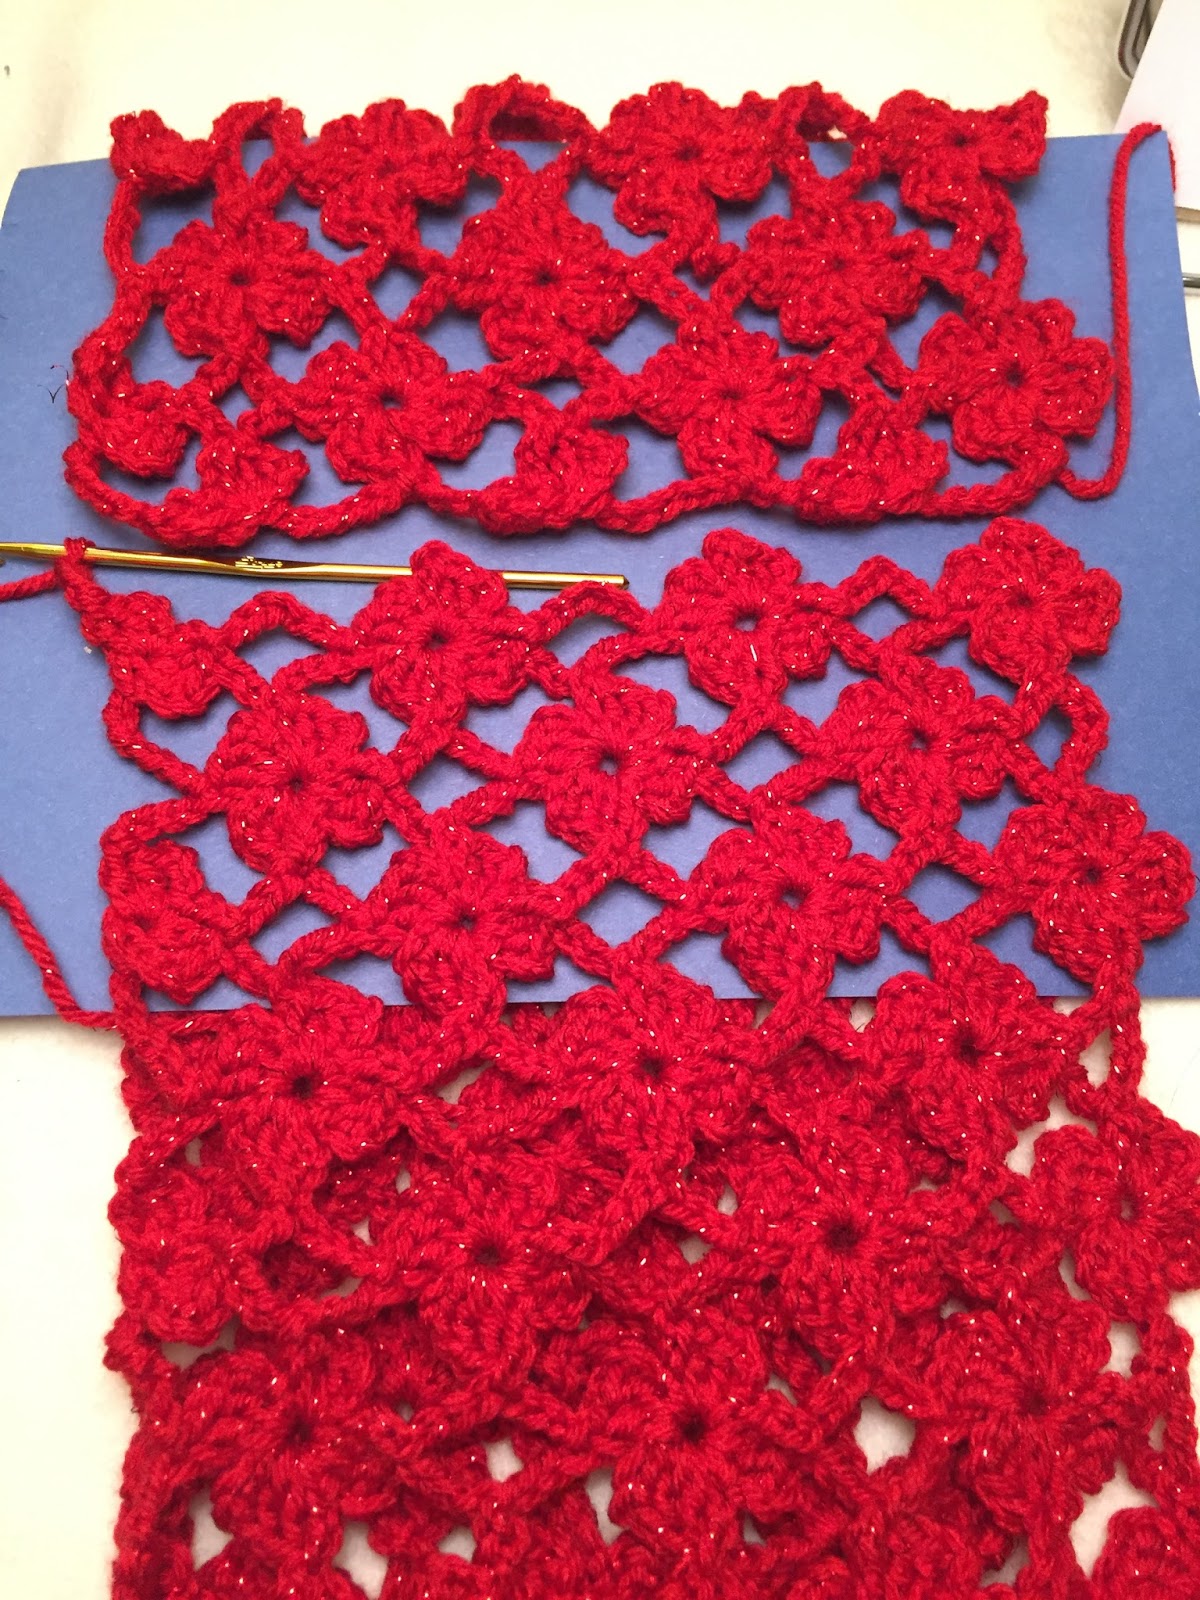
R6: Note: If this is the second or subsequent motif, follow instructions on "How To Join Two Motifs On R6", given below. Slst on next 3 stitches, sc on same st, Ch4, this counts as 1tr. (B)Tr2tog on same stitch, one leaf made. Ch9, tr3tog on same stitch, one corner pair of leaves made. >> (Ch7, sc on next ch-5 loop, ch7, tr3tog on the 3rd ch of next ch-5 loop, ch9, tr3tog on same stitch)3x. Slst on tip of first petal made ((B)tr2tog). Rose Motif made. Fasten off, leaving a 6 to 7 inch yarn tail.

How To Join Two Motifs on R6: Slst on next 3 sts. Ch4, count this as 1 tr. (B)tr2tog on same st.
ch4, join as follows,with right sides of O and N facing outward, [ sc on ch-9 corner sp of O, ch4, tr3tog on same st of N. Ch-9 corner loops are joined. (Ch3, sc on ch-7 loop of O; ch3 , sc on ch-7 7 loop of N, ch3, sc on ch-7 loop of O; ch3, tr3tog on 3rd ch of next ch-5 loop of N, ch4, sc on next ch-9 loop of O, ch4, tr3tog on same st of N. Finish N by following R6 instructions starting at >>.

Making Adjustable tie:

Flower Tie Button B : Ch8, slst on 8th chain to make a ring. Sc on next 8 stitches. slst next st, flip work up to start working on beginning ch-8 loop, ( sc on next st)8x. slst on beginning sc. (Ch2, skip 2 sc, sc on next st) 4x. (Sc on next ch-2 sp, ch1, 4dc on same sp, ch1, sc on same sp)4x. Slst on any stitch to go back to the other side of the work. * (Sc on next sc)8x. Slst next st*. Repeat * * 1 time. Turn work wrong side out. Pull 5 yards of yarn through flower. * (Insert hook on back loop of next st, yo and draw up a loop)4x, yo once and draw up this loop through all loops on hook .* Repeat * * 1 more time. One flower button made. Measure the length of the finish scarf and make as many chains that would equal this measurement. Ch4, insert hook on 4th ch from hook to make a ring. (Sc over ring) 9x. Slst on next sc. (Ch1, sc on next sc.)40x.
Ch3, skip 2 sts, sc on next st)3x. (Sc on next st, ch1, 5dc on same sp, ch1, sc on same st)3x. Slst on next sc, ch1 then pull yarn tight. Fasten off. Flower Button E made. Hide yarn tail inside the flower. See Instructions on Hiding yarn tail.


Join 6 to 8 flowers together for small size, 10 flowers for medium size and 12 flowers for large size.  

Other Options:  Longer  and wider scarf may be made if desired using the following data to calculate how much yarn needed for specific length and width:

1 Flower motif = 24 yds of medium weight (4) yarn.  Extra yards should be added for allowance.


What Does One Do When Waking Up At 2:30 Am And Can't Go Back To Sleep?

It happened again!  I woke up at 2:30 AM and can't go back to sleep, so I checked all the wonderful work of my creative peers whom I'm following on Blogger.  I'm amazed at their work and creativity!  Where do they get all their creative energy and inspirations to finish their craft (crochet/knit) projects?  My creative energy is very sporadic and most of the times runs out before I can finish, my work.  How do you all stay inspired?

Recently, I started teaching a crochet class at a Senior Center nearby and this helps me some to focus on crochet.  Still I feel I'm lacking focus, motivation and energy to finish projects quickly.  After this post if I can't go back to sleep, I'll just get up and  do crochet.

I recently learned how to connect granny squares continuously without breaking the yarn until all the squares are all connected together.  This is a very cool technique because it saves one lots of time since there are not very many tails to hide.  I give credit to these two web sites where I learned the technique:
Please click here and here.

Below, are photos of my practice squares.  This crochet scheme is good for using leftover yarn since the middle squares are small and does not use a whole lot of yarn.


Sunday, January 22, 2017

Snow Flower Shawl/Neck Warmer--Finished

I worked on hiding the yarn tails while watching the Presidential Inaugural Ceremony of President Trump.  This sort of make this shawl memorable to me.  I need to find a nice decorative buttons to add to the overall look of this shawl.  Photos below show the finished shawl with no yarn tails dangling everywhere.
Right Side

Wrong Side

Front

Back

Thursday, January 19, 2017

Snow Flower Shawl/Neck Warmer-- Hiding Yarn Tails

The fun part is over.  It is time to clean up and in crochet this means hiding yarn tails.  More information about hiding yarn tails here.
The edging is completed.  The photo above shows the right side of the shawl while the photo below shows the wrong side and all the yarn tails dangling out.  These yarn tails need to be hidden.  Please click the link given above explaining how to hide yarn tails.


Snow Flower Shawl/Neck Warmer--Flower edging added

I made half flower motifs edging and attach them to the shawl.
Next, I will have to reinforce the edges of the flower edging to give them finish and neat appearance and to prevent curling.  I still have to finish the neckline and hide yarn tails.  

Wednesday, January 18, 2017

Snow Flower Shawl/Neck Warmer

I'm almost done with this one.

I need to add the edging and finish the neckline.

Wednesday, January 4, 2017

Flower cowl#1

Materials used:  Red Heart with Love, Metallic, 1 skein of 152yds/139 m;  Crochet hook, 4.25 mm.

I used the same pattern as the "Flower Cowl" from my previous post , using stitch pattern from this site.  Using solid color shows off the pattern well.

The pattern is easy to follow because of the photos demonstrating the technique.  There is no instructions on how to join the two ends to make a cowl so I'm adding it on this post.   


How To Join The Two Ends Together:

The photo shows the two ends or sides of the finished work.  The beginning row, top part of the photo has incomplete flower motif while the ending row, bottom part of the photo has three complete flower motifs and one incomplete flower motif.  I am a right handed crocheter so I turn the whole set up of the crochet work around so I can work from right to left.  Note:  Do not break the yarn when desired length is achieved but continue to join the two ends or sides together.  In order to join seamlessly the ending row must be made up of completed flower motifs.  See photo above.

Starting from the Ch-3 of the incomplete flower petal, where the hook is currently placed in the above photo, insert hook on the 2 loops of the incomplete petal of the other end of the crochet work.  See photo below.

*Ch3, see photo below.

Slst on the ring. See photo below.
Ch3, 2dc over the same ring, working on other side, slst on the 4th chain of ch-7 loop, counting from flower of the opposite or other end of the work. See photo below.
Ch3, slst back on the ring of other end of work. See photo below
Ch3, 2dc over  same ring, working on same side,
slst on the third chain, counting from ring or center of the flower.
See photo below.
Ch3, sls on the corner of the petal on the opposite end of the work.  See photo below.
ch3, slip stitch on 2 loops of petal on the opposite end, see photo below
Repeat * * until  both ends are connected.  See the completed joining below.


Ch1, pull this stitch tight to close the work.  Cut the yarn leaving a 6 to 7 inch tail to hide the end of yarn.  See tips on hiding yarn tail 

The completed cowl!