Thursday, October 10, 2013

Treasuring Crochet

For information regarding the HWY 411 yard sale please click
this


Hwy 411 yardsale near Etowah, TN

I spent 2 days going through yard sales.  I was looking for a particular household item but I was distracted by all the other items that people are selling.  Some of those items are old crocheted afghans and crocheted thread bedspreads.  I can't imagine how many countless hours that the makers of those beautiful lace bedspreads and afghans have spent making them.

One particular afghan caught my attention.  It looked like a granny square with a three-dimensional Rose motif in the middle of each square.  I liked the color scheme too, which was the color of Fuchsia.  Upon close inspection, I saw that there were knots and yarn tails all over the afghans, where the two different colors of yarn were attached together.  Seeing these,  ruined my appreciation of the Afghan.

I see this quite often in Crocheted Afghans.  Crochet work that are carelessly made diminish the value of the craft (Crochet) as a whole.

I'm also dismayed to see crocheted work tossed carelessly around, because, I know how much time, money and effort have been spent on creating the work, sure the creator of the work must have enjoyed making them and had done them only at their own leisure, but this is beside the point.  Crochet Educators can help the public appreciate the Art and Craft of Crochet by emphasizing to their students the importance of good finishing techniques at the beginning level because some very eager Crochet students would make big projects as soon as they learn to make few basic crochet stitches before knowing good finishing techniques and this is why some crocheted work appears to be carelessly done.

As Crocheters, let's help the public value our work by making neat and tidy crocheted work that may be appreciated for years to come!!!

Not only did I enjoy looking at the many different items on sale but I enjoyed the scenic drive from Monroe County to McMinn County, near Etowah, TN.  This is one event that I'll remember to do again next year.  Here are some more photos along Hwy 411:


Sunday, September 29, 2013

How Well Do You Hide Your Tail?

Sort of a funny question ha?  Seriously, related to crochet, this tedious task must be done for the following reasons:

  • So that finished work looks neat.
  • So that the work (garment, blanket, home decor, etc.) does not unravel during use or laundering process. 
 It is easy enough to hide tails on a project that is made up of  crochet stitches worked closely together; but what about hiding tails on crocheted laces?

My favorite hiding places for tails on a crocheted lace are the center of a motif or any loop where stitches are worked so closely together over them.   If I end my round or row on a mesh, filet, or other areas that consist of chain stitches, I would weave the tail, using appropriate yarn needle, towards the nearest center or loop with the most dense stitches on them, and then bury the tail within them.  See photo A below.

 
Photo A


The red arrow indicates the route that the tail is to be weaved toward the nearest loops.  The tail is buried within several loops or rose petals to ensure that it remains hidden.  Notice that the beginning tail is already hidden within the center of the rose motif.  Always hide tails on the wrong side of work (if there is a right and wrong side).  Some projects, do not have wrong or right side at all.  In this case, it does not matter which side the tail is hidden.

Tuesday, September 3, 2013

Vintage Patterns, Copyright Laws And The Public Domain

I do not understand how some people/entity interprets  Copyright and Public Domain materials.  The scenario is like this:  A vintage crochet pattern that is now on public domain is scanned by someone (or a business/charitable entity).  After scanning, this person or entity claims copyright to the said pattern just because the pattern was compiled in a book that contains all the scanned public domain patterns.  The way I understand it, is that, a published written pattern is either public domain or copyrighted and cannot be both.  If this scenario were true for a pattern that was mass produced and gone to public domain, there could be several copyright claimants for the same pattern.  All they have to do is scan the documents and compile it  along with other scanned public  domain patterns and tell the public they own the copyright.  As far as I know,  Only one person or entity can claim copyright to the same published material or book. 


I found an interesting article and discussion here Although the article is about a photo, same logic should be applied on written materials as well.

Public Domain materials are supposed to be  used by anyone and everyone in "any way they want to use it", .  Sadly, some people and entity interprets "any way they want to use it", to mean, they can use it for their benefit or profit alone and hinder the public from having access to the public domain items.  For more information regarding copyrights and public domain, I found this
and this

After reading the above articles, my conclusion is that no one has the right to claim copyright on materials that are in the public domain.  These materials should remain accessible to the public and use for the benefit of the public and not individual or private enterprise.

Thursday, August 8, 2013

Pretty Wire Decorated Tumbled Stone Pendants


Display The Unique Natural Beauty Of Tumbled Stones By Turning Them Into Necklace Pendants.

I encase each tumbled stone inside a jewelry wire. I try to create a flower or a leaf with the wire as I lay it around the stone.   Each stone is unique in shape, size and color.  Gold and silver works well with these tumbled stones as you can see in the photo.  I bought the stones in Pigeon Forge, 
at this store

The customers pick the stones they like and put them in a tiny bag and the stone filled bag cost $2.50/bag or the larger bag, cost $5.00/bag.  I bought the small bag which contains about 10-12 stones.


I think this is my favorite design.

The necklace is made out of Premier Yarns "City Life" 
The pendant is one of the wire decorated tumbled stones.  The Yarn and the pendant work so well together.


Crocheted Sun Catchers Tutorial

Materials and Tools used:

Red Heart Super saver yarn, med. weight, (2 different colors: A = pink; B = light blue. Or choose your own colors).
Pony Beads (choose your own colors)
Crochet hook, size 5.5mm
Crochet hook, size 3.5mm
Yarn Needle

Pattern Instructions:

Use Color A yarn and 5.5mm crochet hook.
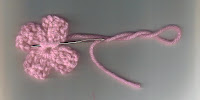
Leave a one inch tail and make an adjustable ring (magic ring) by making a slip knot.  Insert hook into the center of the knot and tighten or loosen knot depending on how big the ring should be, in this case, the ring is 3/8 inch in diameter.  Coil the beginning tail of yarn around the ring. [Ch4. (Tc 2 tog over ring and tail) 2 times.  Ch4, sc over ring and tail]. Repeat [  ] 4 times.  End with slst at the base of first Ch4.  Fasten off leaving a 10 inch tail.  Cut excess beginning tail.  Hide ending tail as shown on photo 1  to 3 and per instructions below.  Cut off  excess tail.

 Photo 1

Photo 2

Photo 3


How To Hide Ending Tail:

Thread yarn onto a yarn needle.  Turn motif wrong side up.  Insert needle on the immediate stitch below the ending knot (ending knot = the stitch that was pulled tight to close the round and prevent the stitches from unraveling). *  Insert needle on several stitches that are "over" the ring.*  Repeat *  * around the ring as shown on above photo 1 to 3.

 Photo 4

Photo 5 Shows the wrong side of the flower motif

Cut remaining tail so that nothing shows after cutting.  See photo 4 and 5. NOTE:  One flower motif is completed.


Photo 6 Shows right side of the flower motif

How To Make The Border Surrounding The Flower:

Attach yarn color B to left corner stitch of a petal, leaving a 1 inch tail. * Ch1, (dc over sc and tail) 2 times. Ch1, sc on the 3rd chain of next ch4.  Ch3, skip next 2 sts, sc next st.

*Ch1(dc over sc)2 times. Ch1 sk next 2 sts of next ch4, sc next st.*
Repeat * * around, except, after last ch3, slst instead of ch1, on top of ch1 at beginning round.
Slip Stitch on next st up to the 2nd ch of next ch3.  See photo7.


How To Make The Stem (The stem is made up of chains and beads)

Photo 7 Shows the completed border surrounding the flower motif.

*Chain 10.  Load Bead (LB) as per instructions below:


How To Load Bead

Remove big hook from loop.

Insert smaller 3.5mm crochet hook into the hole of a pony bead. See photo 8.

 Photo 8

 Photo 9

Photo 10

Photo 11

Insert this smaller hook with bead on it into the loop that was vacated by the bigger hook (see photo9). Draw up this loop through the bead hole (see photo 10). Ch1 (photo11 shows yo to make this ch1).* NOTE:  One bead is loaded on the stem.


Change back into the bigger crochet hook 5.5mm to make the next set of chains, and repeat * *.

How To Make The Curtain Rod Loop ( The loop is where the curtain rod will be threaded if Sun Catchers are to be hung above windows:

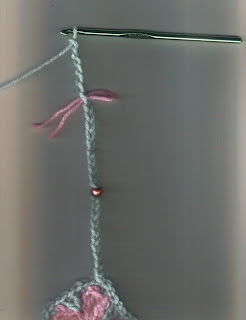
Photo12 shows a pink yarn drawn onto 10th loop to serve as marker.


Photo 13 shows ch7 made after the mark.


Photo 14


Photo 15


Photo 16

Photo 17

Photo 18

After making the required number of chains to meet the desired length, mark the 10th chain (see photo 12).  Ch7.  Yo 5 times (total of 6 loops on hook), see photo 14.  Insert hook where mark is placed, see photo 15, yo and draw a loop through the 7th chain where mark is, see photo 16, NOTE that there are total of 7 loops on hook.   *Yo and draw a loop through 2 loops on hook*, see photo 17.  Repeat *  * 6 times.  Photo 18 shows the completed Curtain Rod Loop.  Ch1.  Tighten stitch (fasten off) to close.  Cut yarn leaving a 10 inch tail.  Hide tail by weaving it within the stitches around the loop, see photo 19 and 20.  Tighten (fasten off) to close. Cut remaining tail off.  Remove yarn marker.

 Photo 19

Photo 20


HINTS:  The stem can be made in varying lengths by making more or less chain stitches.  The Curtain Rod loop may be omitted and use a nylon fishing line for hanging Sun Catchers.

Have fun making these Sun Catchers:) !  Please let me know if some part of the instructions need to be clarified.


Copyright 2013 Eva C. Glover
You, as reader of my blog, have my permission to copy and use the written pattern/tutorials/photos to make items for private, charitable or commercial use.   Please DO NOT COPY OR ALTER THE WRITTEN PATTERN AND/OR PHOTOS OR ANY PART OF THE  WRITTEN TUTORIAL/PHOTOS FOR THE PURPOSE OF SELLING OR DISTRIBUTING  TO THE PUBLIC WITHOUT MY PERMISSION.


Friday, June 28, 2013

Hearts and Flowers Afghan #1--Update

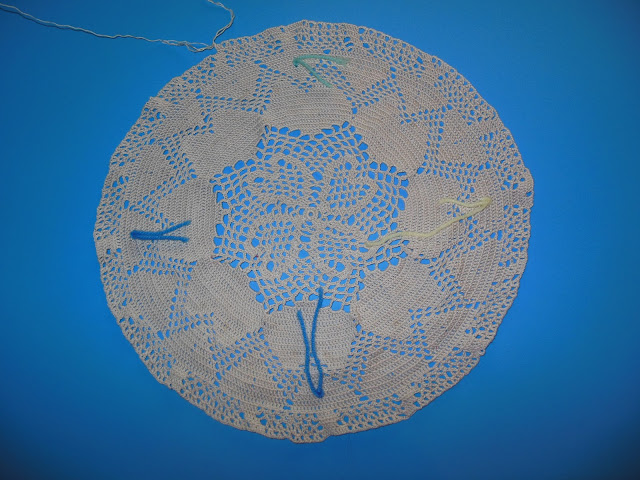
The work continues and it is 41 1/2 in diameter at this photo (below).

I used yarn to mark specific areas e.g. where the flower stems begin.  So far I'm pleased with how it is coming along.  I made a version of this using #10 thread, Red heart.

I made the design a little bit different.  These two are my current active wip.  The Afghan is so bulky at this point to be portable enough to take on trips.  This is one reason I started the Thread crochet version.  Below are photos of the thread version:


 These are experimental crochet work and I hope to write the pattern one of these days.   For now, I'm learning a lot, as you can see, all the stitches varies,  I'm learning what works and what doesn't in making a circular design. 
 
Thanks for stopping by.  I hope you have a good day/evening.


Friday, May 24, 2013

Hearts And Flowers Afghan # 1--Continued

The Afghan at the time of this photo (below) is 29 inch in diameter.  The crochet rounds making up the hearts is finished as well as the solid bar surrounding the hearts.  I'm getting ready to start the flower pots.  These rounds can be tricky because I did not follow exactly the design in my papercut, so now I have to count stitches to mark where each individual flower pot begins and ends.  We'll see what happens.

For more notes on this project, please see my ravelry projects.


Tuesday, May 7, 2013

Hearts And Flowers Afghan #1

This is a continuation of the crochet "Hearts And Flowers".  I'm writing the pattern as I crochet the
design that I made using papercut technique.  For more info on papercut design please click the highlighted link.  I was thinking that I have to transfer the design on graph paper first, but I find out that I can crochet the design directly from the papercut itself.  The photo below shows my progress in crocheting the design.


Thursday, May 2, 2013

Hearts And Flowers Papercut

I made this Papercut design with the hope of translating it into a more lasting durable art form such as quilt, hooked rug or stencil.  I just now thought of translating it into crochet.  So far, so good.  The challenge is, how  can  I duplicate closely the desing into crochet. 

I'm always fascinated with papercut designs but I want the design that I created to be in another media other than paper.   The photos below show my papercut and my crochet (still in progress).


To learn about how to do papercut designs please click on this link


Monday, April 29, 2013

Beaded Crochet Suncatchers

Let's catch the Sunshine with our hooks and yarn and crochet some Suncatchers.  We can embelish it with the use of any materials such as beads, fabrics, natural or synthetic fibers, etc.

Here are  photos of  my first Suncatchers:

Front or right side of the sun catcher


Back or wrong side of the suncatcher


I need to add a pink suncatcher to the other side to make the arrangement look more balanced.

This arrangement look so much better!!!


Wednesday, February 20, 2013

Thread Crochet Shawl #1

Photos of the finished "Thread Crochet" shawl.
It had been in a UFO status for 2 years.  I finally finished it today.  Please read my post titled, "Thread Crochet",  for more info about this project.  It took approximately 13 balls, 120 yds each to make this shawl.  It is made for small size with the width of the shawl covering from neck to waistline.  One important note about this project for future reference is: To attach new ball of yarn at the edge of the project, leaving enough tails to hide under the finishing round (around the edge of the shawl).  This way all the joined ends are securely hidden underneath single crochet stitches and there is no chance of the connecting knots to be undone during use and/or maintenance.


Sunday, January 6, 2013

Diagonal Box Stitch Cowl/Scarf v1 -- Zoe's Method

This Project is done to test the crochet pattern that I wrote. This is a small scarf. It is funny that I always started with making a cowl but I ended up making a scarf instead. I don't like the idea of seaming the scalloped edge of the scarf because I think the scallop edge is pretty. Also, because the scarf is small or narrow at the neck, it is better to leave the front neck open.