Sunday, December 18, 2011


Baby Booties -- Finished (FO)


 It is nice to finish a project in a very short time.  I used crochet hook to bind off the ribbing since I don't know how to make a stretchy knitting bind off on ribbed stitches yet.  I used (slip st on next st, ch1)rep to end method to make the top edge of the booties stretchy.  It made the top edge flare which looks ok.


Tuesday, November 8, 2011

Friday, November 4, 2011


Fan in Winter


I'm making a scarf that is quick to make for a friend.  This is my second day of doing this and a 6 oz. skein of Caron's Simply soft is halfway gone.  For the record:  I'm using crochet hook "Boye" F/5-3.75mm.  I used a bigger hook for the foundation chain "Boye" F/5-5.00mm to make the foundation chain very loose.  These skeins of white yarn have been waiting for sometime and I hope that I can fulfill their full potential and provide warmth to someone this Fall/Winter season.  I should write the pattern, I suppose, but then if I try,  I lose the creative impulse to just work and finish the project.  I wish I have someone who would jut down the detail as I work but this is wishful thinking.  For now, my goal is to finish the project and that is all!!!

Just a side note for those who are learning to knit or crochet:  http://knittersreview.com/forum/
is a good site with lots of friendly knitters/crocheters willing to answer your questions pertaining to these art/craft.

Tuesday, July 19, 2011

Knitting WIP Basket Weave Afghan


Knitting WIP Afghan

 I'm more than half way done on this and I've worked on it for 4 months now.  Knitting is much slower than crochet.   I loved that I'm finally comfortable with both knit and purl stitches.  There are quite a few bobo's on this afghan, but it is my first big knitting project so I will not be too hard on myself.  The main thing is that I'm now proficient in making both purl and knit stitches and I have something to show for my effort.  I want to make another project of the same stitch pattern and when I do it, I want perfection.  In the mean time I need to finish this one.


Wednesday, June 22, 2011

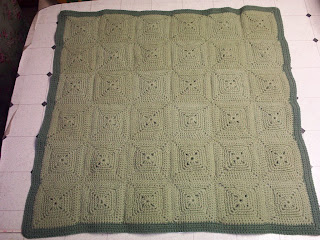
Baby's First Play Rug - Finished

This is a reversible afghan.  For instructions on how to make the squares, please see my older post with the same title.  The individual squares are joined together using a yarn plastic needle and using a herring bone joining technique.  All yarn ends are tucked (woven) underneath the crochet stitches and worked towards and within side A and B layers.  The border is worked in 4 rounds of sc(s), starting with side A up first round, side B up, for second round; Side A up for third round and Side B up for 4th round. Since the border is not worked in a continues fashion,  after connecting with sl st (slip stitch) at the end of the round,* I turn the afghan, then ch1, then sc all around and connect with sl st to the beginning ch1. to complete the round*.  Then repeat * * the same for remaining rounds.  The reason I used this technique is to prevent the crocheted fabric from curling up towards one side of the crocheted fabric (usually the right side, side B).

Side B


Side A

Tuesday, June 14, 2011

Rose Curtain Tie Back on a fleece drape


Tada! How do you like it?  I was going to remove my winter drapes that are made out of fleece to keep heat in and cold out during winter time, but I think I'm just going to keep them open with these tie backs instead of removing them and hanging them back again during Fall and Winter season.

Wednesday, June 8, 2011

Crocheted Rose Curtain Tie Back


I want to make 3 or 4 pairs of these to use as Ties for my Curtains.

Oct. 11, 2017 update:  Pattern for this Tieback is available
here

Monday, May 30, 2011

How To Do T-Shirt Make Over (From Plain T-Shirt To Fabulous Shrug)

Sewing tools and equipments:
Sewing Machine

1 = French Curve
2 = Tailor's Chalk
3 =  Safety pins
4 = Pins
5 = Tube Turner
6 = Scissors
7 = Bobbin
8 = Spool of thread
9 = Tailor's Square

Diagram on how the t-shirt is cut apart

The t-shirt is divided into 3 main parts upper part (Bodice), middle part (mid section), lower part (Bottom) 
The lower part of the shirt becomes the band of the shrug and the middle part becomes the left and right ties.


Bodice:

Top diagram = Fig. 1;  Bottom = fig.2


photo A
photo B


Instructions:

  1.  Choose a well fitting t-shirt. (Old one is recommended for practice).
  2. Put it on and using a safety pin, pin at the front center where you want the sash to be tied.  Put another pin toward the side seams below the bust.  
  3. Take the shirt off and fold as shown in fig.1.  Lay it on the table with the safety pins facing you.  See fig.1 above.
  4. Pin side seams to get the front and back center.  Match the shoulder seams also. Use pins to hold  seams together.  See fig.2 above.
  5. Using tailor's chalk or washable crayons,  mark the places where the safety pins entered the fabric.  Remove the safety pins. See fig.3 above.
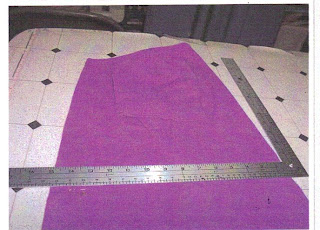
  6. Use a French curve (photo.A) as a guide to mark the cutting line starting  where you just marked (step 5)  from the center towards the side and then use a tailoring square (photo.B) if you have one, if not, use a ruler or yard stick) to guide the marking straight across to the back of the shirt.  See fig.4A
  7. Add 1/4 seam allowance toward the bottom of the shirt from where you marked and this is the actual cutting line.   If you cannot cut by sight maintaining the 1/4 seam allowance all through, mark this area first before cutting.  Then cut on this line. See fig.4A and fig.4B above.
  8. Cut through the front center, which is where the shirt is folded.  Cut a 1/8 ( or less ) notch (A) at the center back of the bodice.  See step 8 diagram above.
  9. Remove the pins and unfold the upper part of the shirt.  Zigzag or serge the raw edges of the front of the shirt, using the same color of thread as the shirt.  Do for left and right front of the shirt.  See step 9. above.
  10. Fold zigzaged (serged) edges 1 and 1/4 inch toward the wrong side of the shirt and pin in places.  See Step 10 and 11 diagram above.
  11. Starting at the neckline, sew (using straight stitch) down to the bottom of the shirt. See Step 10 and 11 diagram above.
  12.  
    Band:
     
     
    1. Make this middle part ( mid section)of the shirt straight by cutting away the slope (uneven) front center created when the top of the shirt was cut away.  See (Band) step 1 diagram above.
    2. Fold lower part of the shirt (hemmed part) towards the middle part, to within 1/2 inch of the raw edge.  The 1/2 inch is a seam allowance.  See (Band) step 2 and 3 diagram above.
    3. Cut at the fold.  See step 2 and 3 diagram above.
    4. Make a 1/8 notch (B), ( or smaller) at the center fold of the bottom part of the shirt.  Later, this notch is to be lined up with  notch (A) of the back center of the bodice before seaming the two parts together.  See step 4 and 5 diagram above.
    5.  Cut open the un-notched center fold.  See Step 4 and 5diagram above.
    6. With right sides together, match notch A (center back of the bodice) and  notch B  ( center ) of the lower part of the shirt.  Stitch together leaving a 1/4" seam allowance, starting from the center (notched) part toward the front.  See step 6 and 7 diagram above.
    7. Finish with zigzag or serge the raw edges.  See step 6 and 7 diagram above.
    8. Cut the excess fabric ( if there is any) at the front ends of the band leaving a 1/4" seam allowance.  This is where the front ties will be sewn.
    Ties:


    photo D


    Ties  (The midsection of the t-shirt becomes the front ties)
    1. Cut the side seams of the mid section of the shirt.  This makes the left and right front ties.  See (Ties) step 1 diagram above.
    2. With right sides together pin the ties to the band's end, positioning the mid sections so that there are 1/4 allowance on top and bottom edges.  See (Ties) step 2 and 3 diagram and photo D above.
    3. Sew together band's ends and ties, starting at the last stitch of the center front. See (Ties) step 2 and 3 diagram above.
    4. Fold lengthwise toward the right side of the bodice (right sides together) and pin to stay in place. See (Ties) step 4 diagram above.
    5. Seam along lengthwise starting at the front where the stitches intersect,  turn at the corner and finish at the fold.  Do the same for the other tie.  Left and right  tie tubes are sewn. See (Ties) step 4 diagram above.
    6. Turn tie tube right side out using a tube turner (See Sewing tools and equipments: # 5).  Dull pencil or size 5 or 6 crochet hook can be used.
    7. Finish front tie by turning seam allowances in and do 3/8" wide top stitching to the tie and bands 1 and 1/2 inch from the front center.  See (Ties) step 7 diagram above.
    8. Clip thread ends and enjoy wearing the T-Shrug.  See (Ties) step 8 diagram above.

    If anyone wants to try this project, I recommend to practice on  old t-shirt that is no longer worn.

    Good Luck and enjoy the project!

      Saturday, May 21, 2011

      From Plain Shirt To Fabulous Shrug

      It's nice to finish a project in less than 2 hours. It gives one a sense of accomplishment. So I took a break from crochet and knitting and made a shrug from a plain t-shirt that I bought on sale. The photos above show the result.  Watch for my How To Instructions on my next blog.

      Wednesday, May 18, 2011

      Good Service at Knitting_Warehouse

      I'm very impressed with the service at Knitting Warehouse I ordered 6 more crochet thread of the colors that I need to finish the Summer Shawl. I ordered them last Thursday and the package arrived this Monday. I'm pleased. I'll definitely buy from them again.:)

      Friday, May 13, 2011

      Thread Crochet

      I was enticed by the color of this Red Heart  crochet thread which sparked my interest to working with crochet thread again.  This is size 3, so it is not too bad for my eyes and I can see the stitches well.  I'm going to make a summer shrug or a shawl if I have enough Thread.  I ordered some more from Knitting Warehouse since Walmart did not have enough.  This is in WIP status along with the baby blanket that I'm knitting. 
      The stitches pattern is from http://mypicot.com and the thread as pictured above is by http://www.redheart.com/

      Sunday, April 10, 2011

      Knitting FO

      I'm learning how to knit and this is one of the result of my knitting experiments-- A knitted washcloth with crochet edging.  Now I'm wishing to knit a baby hat.

      Wednesday, March 23, 2011

      Baby's First Play Rug


      Photo above is side A.

      It's time to get back to crochet.  I'm making a Play rug for a baby so that he/she can lay on it on the floor.  This is a reversible afghan and I'll call this Circle Within a Square Reversible afghan.  Here is the instructions:

      Materials:
      Color A medium green;
      Red Heart (super saver) or your favorite yarn. 7oz, 364 yds/333m, worsted medium 4.
      Color B dark green (same type of yarn)
      Color C light green (same type of yarn)
      Crochet hook: Boye 6/6-4.25 mm
      Plastic needle

      Side A (color:  medium green): Ch4, slip stitch (sl st) on first(f) ch.
      R1   Ch3 *(3dc over ring, ch2).* Repeat(rep)*( )*4times(x).  Sl st on top of first dc.
      R2   Ch1, *[ sc nx(next) stitch(st) up to ch2 space(sp), ch3, sc on same sp]*. Rep *[ ]* until the first ch1.
              Sl st on the first ch1.
      R3   Ch1, *[sc nx st up to ch3 sp. Ch3, sc on same sp, skip (sk)1 st(chain), sc nx st up to ch3sp]*.  Rep *[
              ]* until the first ch1 sl st on the first ch1.
      R4   Ch1 Sc nx st up to ch3 sp*[ch3, sc on same sp, sc nxt ch and remaining chains up to ch3 sp]* .
              Rep*[ ]* until the first ch1, sl st on the beginning (beg)ch1.
       R5   Ch1, sc nx st up to last ch before the ch3 sp.  ATTACH SIDE B AS FOLLOWS:
      NOTE:  See instructions on how to make side B.
       R6  *[[With side A up and wrong sides of A and B facing together, insert hook on both A & B ch3 loops,  yo and draw up loop and make a sc]*; ch3 and rep *[ ]* on same sp. ** [Sc nx 2 ch of side A.  Catch side B(insert hook on nx side A ch and nx side B loop, yo and draw loop and make a sc)]** .Rep* *[ ]** until the ch before the ch3 sp.]]*.  Then rep *[[ ]]* up to beg sc. Sl st. on beg sc
      R7 TURN with side B up.  Ch1, *[Sc nx st up to ch3 sp. Ch3, sc on same sp]*.  Rep *[ ]* until beg sc.  Sl st on beg sc.
      R8 With side B up. Repeat R7.  Fasten off.

      How to make Side B:

      Ch4 and connect to form a ring.
      R1   Ch1 (this counts as 1 sc).  *[sc on nx st ]*.  Rep 11x.  Sl st on top of beg ch1.
      R2  Ch3 (this counts as 1dc; dc on same sp. *[2dc on nx ch]*.   Rep *[ ]*until beg ch3.  ATTACH COLOR A (OR YOUR FAVORITE BACKGROUND COLOR).  Sl st on top of the first ch3 post.
      R3  *[ Ch3, sk1 ch, sc on nx ch]*.  Rep*[ ]* 12x.   NOTE:  12 CH3 LOOPS MADE.  THE 2 END TAILS ARE TUCKED UNDER AS YOU WORK THE CH3 LOOPS.  Fasten off leaving 8" tail for finishing.     Thread this tail through the plastic (yarn) needle.  work the tail through the wrong side stitches making sure it does not show outside by hiding it under dc or sc v bases.  Clip the end.  NOTE:  Side B must be finished (all yarn ends hidden) before it is attached to Side A.

      For those who are trying to make this pattern please let me know if the pattern instructions are clear or if there are any errors.  I'll be happy to clarify  and rewrite to correct them.  I'm learning to write  pattern instructions
      so any positive critique will be appreciated.  Thank you. I hope you enjoy making the afghan.
      Photo below is side B.