Thursday, December 29, 2016

How To Crochet From A Diagram -- Crochet Symbol, A Universal Language of Crochet.


In order to crochet from a diagram, one must learn the crochet symbols used.
In this crochet tutorial, I am using letters to indicate beginning/ending of each round.  Not every round begins with the same stitch.  In the chart,  I'm using letter "B" next to the stitch to indicate where each round begins and the letter "E" to indicate where each round ends.

Once you understand all the crochet stitch symbols and know how to do them, it is easy to crochet any pattern diagram you see on the internet.  One will be able to do crochet designs from other countries because crochet symbol is almost a universal language of crochet with some minor differences in some countries.  Example,  US vs UK.  American or U.S. crochet symbol is what I use.

The above motif and diagram looks complicated but it can be simplified by following the chart and instructions one round at a time.  But first one needs to be familiar with the crochet symbols, abbreviations and what they stand for as well as some crochet terms and their meaning.


Flower Baby Afghan

Total number of blocks = 49;  7 blocks accross and 7 Blocks down; each block measures 5 1/2 inch.  Measurement of Afghan without the edging = 38.5 x 38.5 Inch.


Tools And Materials:
Bernat Baby yarn, 1 big ball of 1256 yds/1148 m and 1 small skein of the same yarn for edging.   Crochet hook - size 3.75mm; yarn needle for hiding tails.  For information about this yarn, click here

Pattern Instructions For Flower Baby Afghan
IT IS IMPORTANT TO NOTE THAT THE AFGHAN IS DONE IN A "JOIN AS YOU GO" METHOD, WHERE EACH SQUARE IS JOINED TO THE REST OF THE SQUARE MOTIFS DURING THE LAST ROUND.  The advantage of this method is that there is less yarn tail to weave in and hide after all the squares are connected together because each square is already attached to the rest of the square motifs at the end of the round completing each square motif and before breaking the yarn to start another square motif.

Foundation Ring: Ch5, Slst on 5th ch from hook to form a ring.

   Instructions for Right Handed Crochet:


Instructions for Left Handed Crochet:


R1:  Note:  Foundation ring is in color pink; R1 is in color blue.  Optional:  See  tip on how to hide yarn tail within foundation ring here.  Note:  Click here to learn how to make tr3tog stitch. Ch3, count this as 1 tr.  Make tr2 tog over ring.  One flower petal made. (Ch3, tr3tog over ring) 7times.  Ch3, Slst on  top of next petal, see diagram below.   8 petals made.

Right Handed Crochet

For Left Handed Crochet


R2:  Note:  On the Crochet Diagram below, Round 1 is colored in blue and Round 2 is colored in orange.  Refer to Crochet Symbols.   (Sc next sp. Ch5, Sc on same sp, ch3, sc on next sp,ch3, sc on same sp. Ch3).  Repeat  (  ) around.   Finish round with slst on next sc.

Diagram for Right Handed Crochet


Diagram For Left Handed Crochet


R3:  Note:  In the diagram below, round 2 is shown in color orange and round 3 is shown in color green.  Slst on next 2 sts, sc on same sp, *ch7, sc on same sp; (ch3, sc on next sp)4 times.*
Repeat *  * around.  Finish round with slst on next sc.

Diagram For Right Handed Crochet


Diagram For Left Handed Crochet


R4:  Note: Round 3 is shown in color green and R4 is shown in color purple in the Diagram below.  Slst on next 3 stitches, ch4, 5dc on ch-7 space, sc on next space or loop.  *(Ch3, sc on next sp)3 times.  5 dc on next ch-7 sp, ch2, 5 dc on same ch-7 sp, sc on next sp.*  Repeat *  * 2 more times.  (Ch3, sc on next sp)3 times, 4dc on next ch-7 sp.  Finish round with slst on 2nd ch of next ch-4.


Right Handed Crochet


Left Handed Crochet


R5:  Note:  If this is the second or subsequent motif, see instructions "How To Join Two Motifs while doing R5."  If this is the first motif, follow instructions below.

Note:  In the diagram below, round 4 is shown in  color purple and round 5 is shown in color dark blue.  *Sc on next sp, to begin this row, see letter B next to + sign in diagram below.   Ch5,
sc on same sp.  >>Ch3, skip next 2-dc; sc next st.  (Ch3, sc next sp)3 times.  Ch3, skip 2-dc, sc on next st; ch3, skip 2-dc.*  Rep *  * around.  Finish round with slst on next sc, See letter E next to bold dot on diagram below.  Fasten off by making ch1 then pull this stitch tight to close the round.  One flower square motif is completed.  Cut yarn leaving a 6 inch or more yarn tail for weaving in the yarn tail with the use of a yarn needle.  See "How To Weave In Yarn Tails" here

Diagram For Right Handed Crochet


Diagram For Left Handed Crochet


How To Join Two Motifs While Doing R5:
See the photo and diagram below.
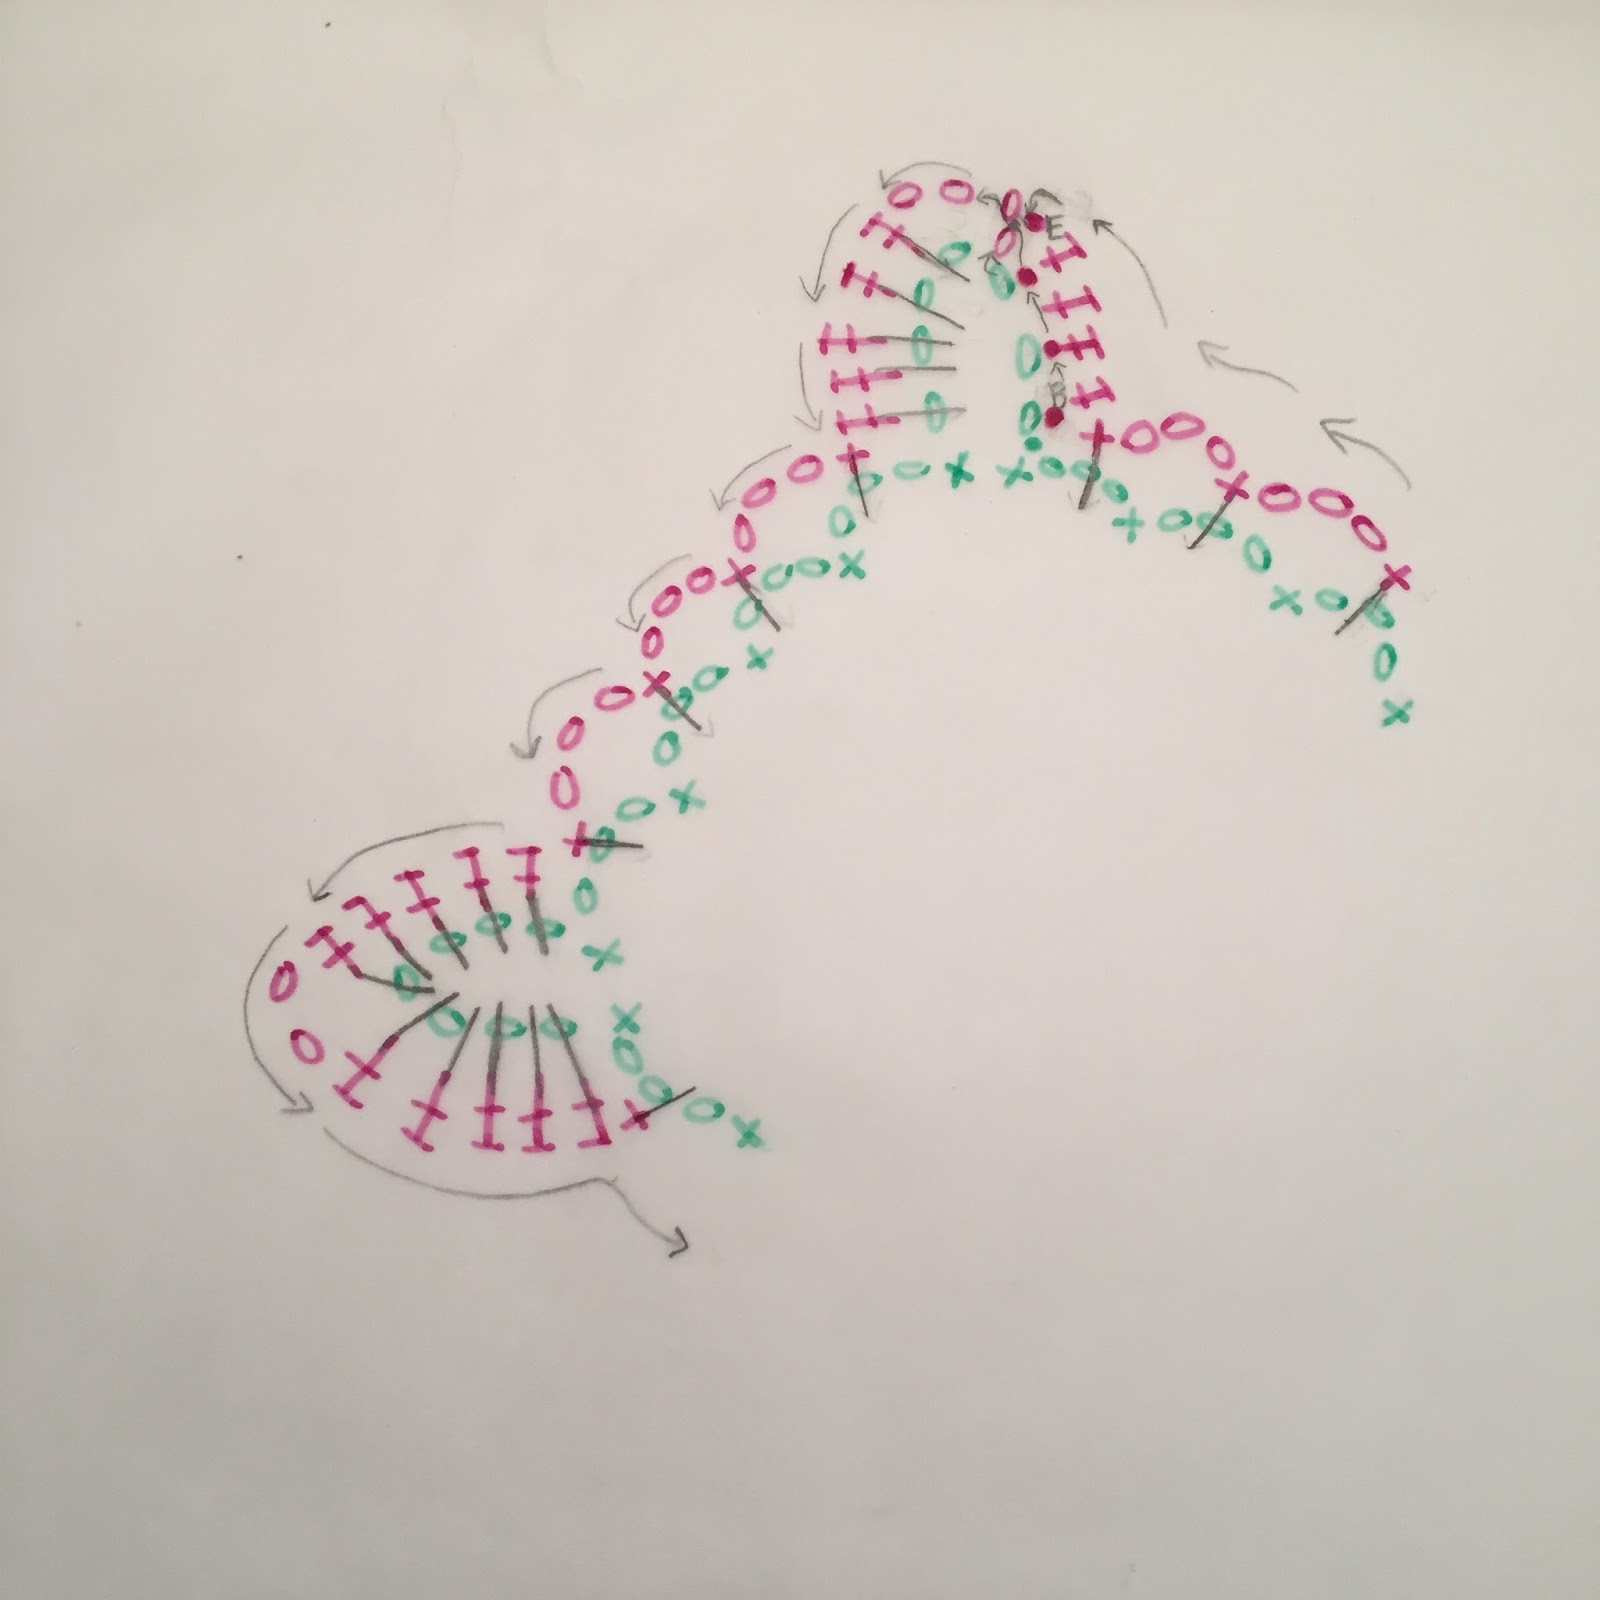
O = Old motif or first motif represented by a pink and black line;    N= New or subsequent motif represented by dark blue color.  Sc on next sp of N.  Ch2,  hold the ch-2 loop of new motif over the ch-5 loop of the old motif O with wrong sides facing together.  Sc on O; ch2, sc on same sp of N, ch1, sc on next sp of O; ch1, skip next 2 posts of N, sc on next st of N, (ch1, sc on next sp of O, ch1, sc on next sp of N) 3 times.  Ch1, sc on next sp of O, ch1, skip next 2 dc posts of N, sc on next st of N.  Ch1, sc on next sp of O.  Ch1, skip next 2-dc of N, sc on next ch-2 sp of N.  Ch2, sc on ch-5 space of O, ch2, sc on same space of N.  Photo below shows the two flower motifs joined together.
Complete Round 5 of the new motif following the instructions given for R5 beginning at this >> symbol.   

Diagram For Right Handed Crochet
Pink + means sc on old motif; blue + means sc on new motif.


Diagram For Left Handed Crochet

How To Join A Square Motif To Two Motifs That Are Already Joined Together:   I used two different color of finished flower motif to show how the two or more squares are joined together.
The method is the same as the instructions given above " How To Join A Square Motif To Two Motifs That Are Already Joined Together", the only difference is that when joining at the Ch-5 corner loops, the sc after making ch-2 on N, is done on 2 loops of the sc that joined the 
ch-5 corner loops together, instead of on the Ch-5.   See where the hook is inserted on photo below.
The hook is inserted on the two loops of the sc that joins the two old /O square motifs together on  photo above.

A sc is made on the joining sc, ch2, ready to make sc on same ch-5 loop of N.  See photo below.

Three Square motifs are joined together as shown on photo below.
Continue to finish the N or new motif as per prior instructions on R5 beginning at this >> symbol.

How To Join A Square Motif To Three Old O Motifs That Are Already Joined Together:


Starting on ch-5 corner loop follow the same instructions given above, "How To Join Two Motifs While Doing R5".  After making ch2 on ch-5 loop of N insert hook on 2 loops of the sc of O, see photo below

Study the four conjoined corners of the four motifs in photo below
Continue to join the new motif to the next old motif following the same instructions given, .  Photo below shows the new N motif completely joined to the rest of the motifs.
Continue to do R5 following instructions given for R5 beginning at this symbol >>.  Photo below shows the completed New motif at end of R5.
The finished baby blanket is shown above.

Thank you for taking the time to look at this pattern, any questions or comments to clarify the pattern is welcome and appreciated.


Monday, December 19, 2016

Crocheting From a Diagram


I-phones or tablets are not just for taking selfies.  These gadgets can help crocheters to enhance patterns for better reading.  Most of the written or graphed patterns in the market are very hard to read because the letters, characters or symbols are very tiny.  With written instructions, the words and sentences run together in one continues string and it is very easy to get lost while reading them because most of the sentences are so similar that it is easy for your eyes to wander off away from where you are working when you shift your focus away from the instructions to look at your work.

With graphed or charted instructions, the characters or symbols or open or closed spaces in filet crochet are too small, that if you have to count the spaces or stitches as you follow a pattern, it is also very easy to get lost or very hard to do accurate counting. 

At this age of technology, no one should struggle with these kinds of problems while crocheting or knitting.  Use your i-phone or tablet with touch screen functionality to take a photo of the pattern you are working on.   If your i-phone or tablet has a photo editing tools, use these tools to enlarge or focus on the part you are working on so that you can see clearly where you are in the pattern.  Using the touch screen of your iphone or tablet you can scroll from left to right or up and down the pattern page.

Another way is to make a hard copy of the enlarged pattern then you can use different colored highlighter to mark where you are on the pattern page.

Sunday, November 13, 2016

Hats


Now that it is cooler weather, it is time to think about winter accessories.  One of my favorite crochet project is making berets.  I made three hats for adults; one for toddler and one for infant.

Happy Crocheting to all!

Monday, January 4, 2016

Crocheted Flower Shawl

I started this shawl yesterday.  My only regret is the yarn I'm currently using is Red Heart.  I want a softer yarn for a shawl so I may turn this into an afghan instead and buy some Caron Simply soft for a shawl.  I got the idea from Pinterest but I'm not able to find a written pattern except a photo of the finish shawl and a diagram.  Here's how my version looks like:

Wednesday, October 28, 2015

Cape With Rose #2--How To Wear


This cape comes with 2 rose ties:  One that is short to fasten to the front and wear the cape as a wrap around the shoulders;  the longer rose tie is threaded on the loops at the neckline and pulled tight enough for comfortable fit around the neck.

Different Ways To Wear The Cape With Buttons

 Back view of the cape.


This Cape can be worn in a variety of ways as shown by the photos:  Above photo shows the cape being worn close to the neck and buttoned down at the chest.  The photo below shows it as a wrap worn around the shoulders.  This is possible because of the tie that adjusts the width of the neckline.


Note that in the remaining photos below I turned the cape upside down so that the wider blue border is now the neckline.


Monday, October 26, 2015

Cape/Cowl/Hood With Buttons

This cape can be worn tighter close to the neck or worn as a wrap around the shoulders by tightening or loosening the tie.  It can also be worn over the head.  It can be unbuttoned in places or completely and be worn as a scarf or neck warmer.

Cape With Rose #1


This cape can be worn two different ways:  1) Wear it closer to the neck with the use of a longer rose tie. 2)  Wear it as a wrap around the shoulder by using the shorter rose tie.

Tuesday, September 15, 2015

Monday, September 14, 2015

Easy Lacy Shawl - Current Project

I'm currently working on this one and I'm writing the pattern while making it. Writing the instructions slow down the process of creating  and also somehow take away the joy of just making something on impulse.  But the long term benefit of writing the instructions outweigh the joy of creating impulsively.  With written pattern, I can share the work and I can do it over again in the future.

Thursday, September 10, 2015

Wednesday, October 15, 2014

Say Goodbye to summer and Hello To Fall!

I always find it difficult to say goodbye to people most of all but also to most things   I have, and saying goodbye to a season is no different.  I want to hold onto them for as long as I can.

It suddenly turned cold but I want to cling on to spring and summer, at least in the colors of my clothes.  I have not taken out my cold weather outfits and it already turned cold!  To express my rebellion,  I'm wearing these outfits!  See photos below.


Thread Crochet -- Wild Rose Crochet Motif


Friday, August 8, 2014

Granny Square Using Tapestry Crochet Technique


Most Tapestry Crochet that I've seen are done in Single Crochet (sc) but it is possible to do it in Double Crochet (dc) also.  The Granny Square above is done using Tapestry Technique in Double Crochet (dc) except the last round which was done in Single Crochet (sc).

Thursday, October 10, 2013

Treasuring Crochet

For information regarding the HWY 411 yard sale please click
this


Hwy 411 yardsale near Etowah, TN

I spent 2 days going through yard sales.  I was looking for a particular household item but I was distracted by all the other items that people are selling.  Some of those items are old crocheted afghans and crocheted thread bedspreads.  I can't imagine how many countless hours that the makers of those beautiful lace bedspreads and afghans have spent making them.

One particular afghan caught my attention.  It looked like a granny square with a three-dimensional Rose motif in the middle of each square.  I liked the color scheme too, which was the color of Fuchsia.  Upon close inspection, I saw that there were knots and yarn tails all over the afghans, where the two different colors of yarn were attached together.  Seeing these,  ruined my appreciation of the Afghan.

I see this quite often in Crocheted Afghans.  Crochet work that are carelessly made diminish the value of the craft (Crochet) as a whole.

I'm also dismayed to see crocheted work tossed carelessly around, because, I know how much time, money and effort have been spent on creating the work, sure the creator of the work must have enjoyed making them and had done them only at their own leisure, but this is beside the point.  Crochet Educators can help the public appreciate the Art and Craft of Crochet by emphasizing to their students the importance of good finishing techniques at the beginning level because some very eager Crochet students would make big projects as soon as they learn to make few basic crochet stitches before knowing good finishing techniques and this is why some crocheted work appears to be carelessly done.

As Crocheters, let's help the public value our work by making neat and tidy crocheted work that may be appreciated for years to come!!!

Not only did I enjoy looking at the many different items on sale but I enjoyed the scenic drive from Monroe County to McMinn County, near Etowah, TN.  This is one event that I'll remember to do again next year.  Here are some more photos along Hwy 411:


Sunday, September 29, 2013

How Well Do You Hide Your Tail?

Sort of a funny question ha?  Seriously, related to crochet, this tedious task must be done for the following reasons:

  • So that finished work looks neat.
  • So that the work (garment, blanket, home decor, etc.) does not unravel during use or laundering process. 
 It is easy enough to hide tails on a project that is made up of  crochet stitches worked closely together; but what about hiding tails on crocheted laces?

My favorite hiding places for tails on a crocheted lace are the center of a motif or any loop where stitches are worked so closely together over them.   If I end my round or row on a mesh, filet, or other areas that consist of chain stitches, I would weave the tail, using appropriate yarn needle, towards the nearest center or loop with the most dense stitches on them, and then bury the tail within them.  See photo A below.

 
Photo A


The red arrow indicates the route that the tail is to be weaved toward the nearest loops.  The tail is buried within several loops or rose petals to ensure that it remains hidden.  Notice that the beginning tail is already hidden within the center of the rose motif.  Always hide tails on the wrong side of work (if there is a right and wrong side).  Some projects, do not have wrong or right side at all.  In this case, it does not matter which side the tail is hidden.

Tuesday, September 3, 2013

Vintage Patterns, Copyright Laws And The Public Domain

I do not understand how some people/entity interprets  Copyright and Public Domain materials.  The scenario is like this:  A vintage crochet pattern that is now on public domain is scanned by someone (or a business/charitable entity).  After scanning, this person or entity claims copyright to the said pattern just because the pattern was compiled in a book that contains all the scanned public domain patterns.  The way I understand it, is that, a published written pattern is either public domain or copyrighted and cannot be both.  If this scenario were true for a pattern that was mass produced and gone to public domain, there could be several copyright claimants for the same pattern.  All they have to do is scan the documents and compile it  along with other scanned public  domain patterns and tell the public they own the copyright.  As far as I know,  Only one person or entity can claim copyright to the same published material or book. 


I found an interesting article and discussion here Although the article is about a photo, same logic should be applied on written materials as well.

Public Domain materials are supposed to be  used by anyone and everyone in "any way they want to use it", .  Sadly, some people and entity interprets "any way they want to use it", to mean, they can use it for their benefit or profit alone and hinder the public from having access to the public domain items.  For more information regarding copyrights and public domain, I found this
and this

After reading the above articles, my conclusion is that no one has the right to claim copyright on materials that are in the public domain.  These materials should remain accessible to the public and use for the benefit of the public and not individual or private enterprise.

Thursday, August 8, 2013

Pretty Wire Decorated Tumbled Stone Pendants


Display The Unique Natural Beauty Of Tumbled Stones By Turning Them Into Necklace Pendants.

I encase each tumbled stone inside a jewelry wire. I try to create a flower or a leaf with the wire as I lay it around the stone.   Each stone is unique in shape, size and color.  Gold and silver works well with these tumbled stones as you can see in the photo.  I bought the stones in Pigeon Forge, 
at this store

The customers pick the stones they like and put them in a tiny bag and the stone filled bag cost $2.50/bag or the larger bag, cost $5.00/bag.  I bought the small bag which contains about 10-12 stones.


I think this is my favorite design.

The necklace is made out of Premier Yarns "City Life" 
The pendant is one of the wire decorated tumbled stones.  The Yarn and the pendant work so well together.